Guide to Growing Your Business Using Google Analytics and Google Tag Manager
If you’re a small business owner or have worked with a marketing firm for any length of time, you will have heard the terms Google Analytics, KPIs and goal completion rate. You may even glance at a digital marketing report once a month with eye-catching bar graphs and trend lines. But where does the data come from, and what does it have to do with growing your business? How do we get from pie charts to real data-driven marketing decisions? Tools such as Google Analytics and Google Tag Manager are vital to measuring the success of your digital marketing and knowing how to implement those tools will help you accomplish your business goals.
Your Website Needs Analytics Tracking, Right Now
Website analytics tells you how many people are visiting your website, where they’re coming from, how they got there and what they’re doing while they’re there.
If your business has a website, it needs analytics tracking. Analytics allows you to capture historical and baseline data that provides context to your digital marketing growth, presence and decisions. It makes it easier to see if all those online orders were a result of the marketing email you sent or the Facebook ad you ran. All those pretty pie charts can tell you where your marketing dollars are best spent.
There are different tools out there, but we use Google Analytics. It’s free, allows you to customize dashboards and reports, and it’s easy to integrate with other Google products. We pair Google Tag Manager with Google Analytics to make tracking easier without messing with website code.
Identifying and Tracking Your Top 3 Digital KPIs
With the extensive data Google Analytics and Google Tag Manager can provide, it’s easy to get overwhelmed and not be able to see the forest for the trees. Instead of trying to look at all the data available, identify and concentrate on the metrics that correspond with your business’s top three key performance indicators.
Start with your business objectives, make the objective measurable and then match it with metrics. For example, Harry’s Auto Garage’s main goal is to gather leads, so their digital KPI would be the number of contact form leads they receive from their new website. Every month, Harry and his team would study total goal completions, goal completion rate and views of their contact page to see if they’re meeting that objective. They can also measure how their sales emails and Facebook ads contributed.
| Business Objective | KPI | Metric |
|---|---|---|
| More Leads | Number of leads received from the website | Goal completion, Goal Completion Rate, Contact pageviews |
| Brand Awareness | How many people use the website | Total Sessions, Total Users, New vs. Returning Users |
| Expanding into a new state | Web traffic, leads and sales from new state | Sessions and Users by Region, Goal Completions |
Once you’ve established and started tracking your KPIs, you can use them as benchmarks to measure the growth and success of your digital marketing efforts and use them to make real data-driven decisions about your digital marketing.
Now that we’ve covered why and what you should be tracking on your website, we will now focus on creating your Google Analytics and Google Tag Manager accounts, implementing the tracking code on your website and getting started with your first tag.
Table of Contents
- Checking Your Website for Existing Google Analytics Code
- Creating a Google Analytics Account
- Creating a Google Tag Manager Account
- Installing Google Tag Manager on Your Website
- Installing Google Analytics with Google Tag Manager
Remember, you don’t have to be an expert in Google Analytics or installing tracking code to get the benefits they provide. If you would rather work with a trusted partner and receive reports with detailed explanations and recommendations, we can help.
Checking Your Website for Existing Google Analytics Code
The first step is to determine if your website already has Google Analytics installed. Depending on how old your website is and how many hands it’s passed through, someone may have previously installed tracking tags. If Fiore Communications manages your website, you can skip this section, it’s already been taken care of.
Next, install Tag Assistant, a Chrome extension. It will allow you to check your website for the presence of tracking code/tags and help you troubleshoot any issues in the steps to come.
To check your website using Tag Assistant (after installing the extension and making sure it is on), first open your website in Chrome. Click the Tag Assistant Icon. You won’t see any data until you click the Enable button and refresh the webpage.
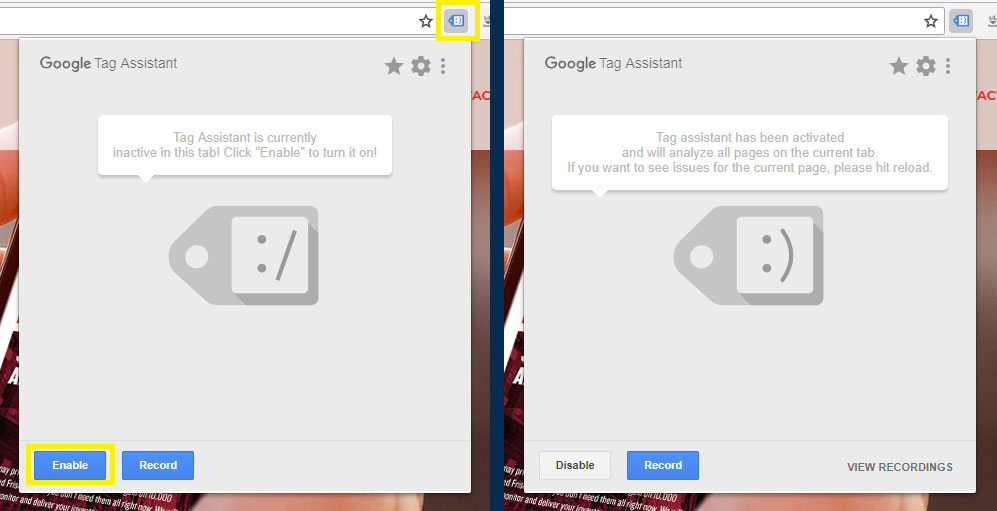
You may see a list of results that could include things such as Google Analytics, Google AdWords and/or Google Tag Manager. You may see no tags listed at all. If that is the case, you can skip to Creating a Google Analytics Account.

Tag Assistant Alternative
If you don’t want to use Tag Assistant or are working in a browser other than Chrome, try right-clicking on your homepage and selecting view page source. Use the keyboard shortcut Ctrl+F to open the search function in your browser. Search for “Google” to find any existing tracking code within the head tags on your page.

If your website has tracking code installed, you’ll need to identify where the code is implemented and try to gain access to the corresponding Google Analytics account. Depending on whether the existing account is in use, you’re able to contact the owner of that account and if they give you edit permissions, you may choose to remove existing Google Analytics code and start with a new account. In that case, I recommend moving on to creating a new account and gathering the new tracking code snippet before removing the old one.
A word of warning: Altering code on your website can go very wrong, very fast. If you don’t have experience making these kinds of changes, please contact your web developer for assistance and make sure you have a site backup ready to go, just in case.
Creating a Google Analytics Account
 It is really easy to create a Google Analytics account. All you need is a Gmail address and a website you want to add analytics to.
Visit the Google Analytics page and sign in/sign up. Follow the prompts and input an account name, website name and your website URL. You will be directed to your Tracking ID and tracking code, but you can skip that part for now as we’ll be using Google Tag Manager to install Google Analytics on your website.
Return to the default Admin menu view by clicking the back arrow. Google Analytics automatically creates one view for your property/website: All Web Site Data. (Read more about Views.) At this stage, it is helpful to create two more views: Filter Test and Filtered View. Google Analytics allows you to create and apply filters to your data to filter out spam or view a subset of your data. When you apply filters to your data, that data is gone, forever! It’s a best practice to have an unfiltered view (All Web Site Data) as a backup, a main/filtered view that will show you only the data you want to see (Filtered View) and a third view to test filters before applying them to your main view (Filter Test).
To create a new view, select the Create View button, name your view and save.

Creating a Google Tag Manager Account
 Technically, you could install Google Analytics tracking code directly into your site and call it a day. But what if you want to make changes? What if you decide to start a pay-per-click campaign and need to install code to track conversions? With Google Tag Manager you can make all these changes in one place, reduce the number of times you have to tinker with the code on your actual website and preview changes before pushing them live.
In Tag Manager, you chose variables (placeholders) and triggers (like a click or a page view) that will fire or execute tags on your website. The tags are the actual segments of code that send tracking information to a third party, such as Google Analytics. If a tag isn’t fired, the code it contains won’t be placed or executed on the web page.
Before you can access all these cool features, you have to create an account. Again, you will need a Gmail address to sign in/up for Tag Manager. Select an Account and Container name (often the Account and Property names you used when creating your Google Analytics account). You will be asked where you want to use the container. Pick the web option and agree to the terms and conditions.
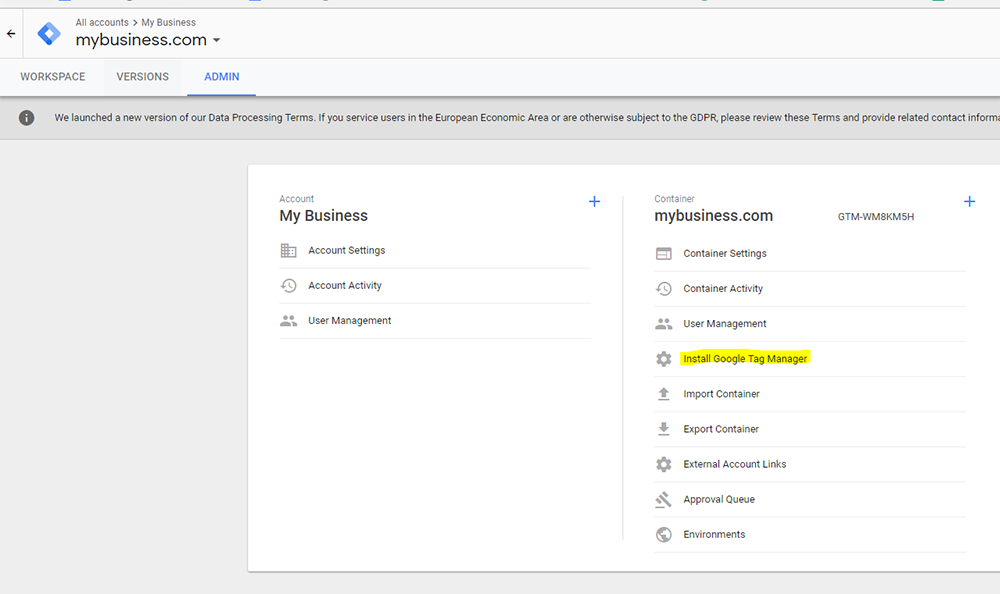
You’ll immediately be presented with the code to install on your website. If you need to find that code again, navigate to Admin and then Install Google Tag Manager.
Congratulations, you’re ready to install the tracking code on your website!
Installing Google Tag Manager on Your Website
We will focus on implementing Google Tag Manager with WordPress, becuase that’s the CMS we use most often, but you can use Google Tag Manager with any CMS, as long as you have access to the <head> and <body> tags.
According to Google’s instructions, you will need to place your first code snippet as high in the <head> tag as possible, and the second snipped immediately after the opening <body> tag. Have your code snippets open in one window, ready to go for installation.
WordPress Users
 There are two ways to install the Google Tag Manager code on your website: directly in the theme files or via a plugin. Whichever method works best for your business’s website, always remember to make a backup before making any major website changes.
If you’re comfortable editing theme files and your website uses a child theme, you can edit via your child theme. Log into your Admin panel, and navigate to Appearance and Editor. Make sure your child theme is selected. Most often the <head> and <body> tags are located in header.php. Place your first code snippet at the top of the <head> tag and your second immediately after the opening <body> tag. Save, and you’re done.
If you’re not comfortable editing code or your company’s website uses a parent theme that receives automatic updates (as opposed to a custom theme that does not get updated), it is best to use a plugin such as Header, Footer and Post Interjections by Stefano Lissa. Log into your Admin panel, install and activate the Header and Footer plugin. Navigate to Settings and then Header and Footer. Paste your first code snippet in the <HEAD> PAGE SECTION INJECTION box and your second in the AFTER THE <BODY> TAG box. Save, and you’re done.
Everybody Else
Log into your CMS or access your website via FTP. Most websites will use a template labeled header or head, which will contain the <head> and <body> tags where you need to paste your code. If you don’t have access to your website’s theme or template files, try contacting your company’s web administrator or friendly IT expert.
Testing Your Google Tag Manager Installation
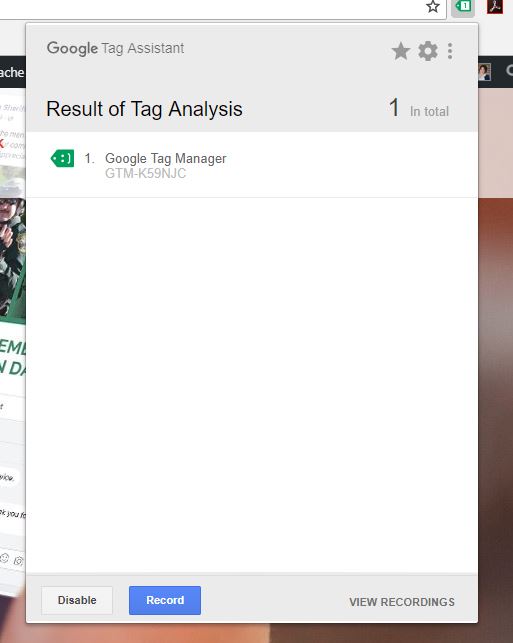
If you haven’t already done so, now is the time to install the Tag Assistant extension. Test your code implementation the same way you checked for existing tags: Open your website, click the Tag Assistant extension icon, refresh the page and click the icon again.
You should see a listing for Google Tag Manager with a colored icon. If the tag is yellow or red, something went wrong. Click on the listing and you will be taken to a list of suggested optimizations.
If the icon is green, congratulations! You’ve successfully installed Google Tag Manager.
Installing Google Analytics with Google Tag Manager
If Google Tag Manager has been successfully installed on your website, you are officially done messing with website code (for analytics purposes). The next step is installing Google Analytics via Tag Manager.
Create a New Tag
In your Google Tag Manager Container, create a new tag. There are different schools of thought when it comes to tag naming conventions, but your best bet is to be clear and consistent. You want to be able to look at your tag names and immediately know what they are and what they do. The tag we are creating will send a page view to Google Analytics and will fire on all pages, so consider a naming convention such as: Google Analytics – Pageview – All Pages.
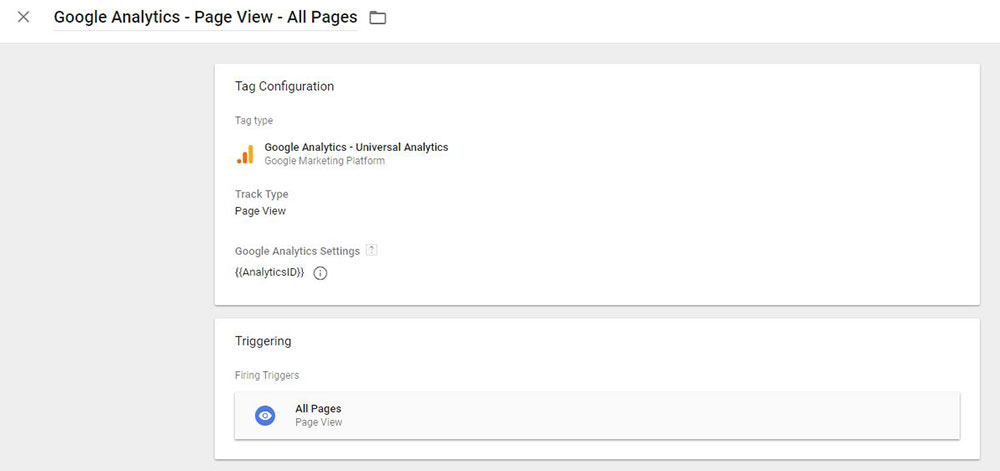
Select the Google Analytics – Universal Analytics as the tag type and Page View as the Track Type. For the Google Analytics Settings, you need your Google Analytics tracking ID. Open Google Analytics and navigate to your Admin panel. Click Property Settings to view your tracking ID.
Create a New Variable
Back in Google Tag Manager, select Create a New Variable and name it Google Analytics ID. The variable type will be Google Analytics Settings and the tracking ID will be the one you just found in Google Analytics. Save the variable and return to the tag configuration.
Create a New Trigger
Click on the icon under Triggering to bring up the trigger options. Click the arrow at the top right to create a new trigger and name it All Pages. The trigger type should be Page View and the trigger should fire on All Page Views.

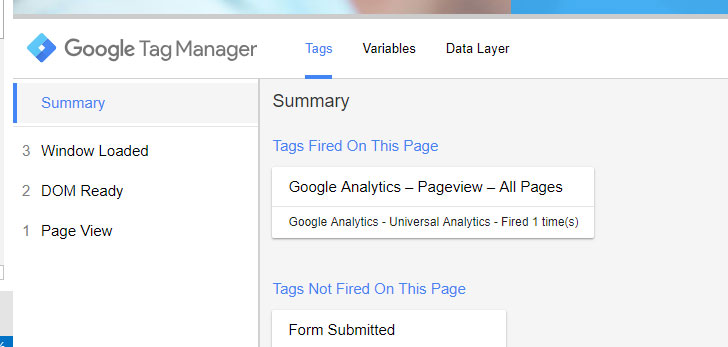
It’s time to test your first tag. Click the Preview button at the top of your workspace menu. A large orange notification will let you know that you’re in preview mode. Visit your website in a new window.
You will see the Google Tag Manager Debug menu at the bottom of your website. If you’ve set up the tag correctly, you will see it listed under Tags Fired On This Page. If the tag isn’t fired, use Tag Assistant to help you troubleshoot the issue.
Don’t forget to go back to Google Tag Manager, leave preview mode, and submit and publish your changes. You did it! After 24 hours, you will start to see data populating in your Google Analytics account.
You are well on your way to using Google Analytics to make data-driven marketing decisions. Now that you know where you are (digitally), we can help you get where you want to go even faster. Contact us to discuss all your digital – and traditional – marketing needs.


